CSS3 Inheritance Tips and Tricks – inherit, initial & unset

It’s easy to overlook the cascading features of style-sheets. Most designers/developers are aware of the inherit keyword but there are a few new inheritance features in CSS3 you may not be aware of…  read more @ http://www.css-jquery-design.com/…

css3-inheritance-tips-and-tricks-inherit-initial-unset

property: inherit;

The inherit keyword means “use whatever value is assigned to my parent”. If no value was explicitly defined on the parent element, the browser works up the DOM tree until the property is found. Ultimately, it ends at the browser  read more @ http://www.css-jquery-design.com/…
read-more-button

Pure CSS3 Animated Polaroid Gallery

Normally, Polaroid Gallery is a CSS3 & jQuery Image Gallery plugin for Media Library. It is used to overlay images as Polaroid pictures on the current page or post.

It’s a sure thing that CSS3 features like transitions, animations and transforms can add extra spice to your designs. In this article you will see how you can build an awesome CSS3 animated  Polaroid pictures gallery with some of these cool features.  This is something I wished to do for a while and I finally made it.css3-animated-polaroid-gallery

The HTML

The HTML structure hasn’t changed at all, simple and minimal. Here’s an excerpt:

<div class="photo-album">
<h2>Dhiraj, Geetu & Atharv at Taj ↦ Agra
  <a class="large polaroid img1" href="#"> 
    <img alt="" src="https://lh3.googleusercontent.com/-73u0oSgSX0w/UQ6PZ0Z1wOI/AAAAAAAADPE/57bc9C0BEG0/s512/Agra-trip%252520112.JPG" /> 
    Camel wants to kiss Atharv. </a> 
  <a class="polaroid img2" href="#"> 
    <img alt="" src="https://lh4.googleusercontent.com/-cPFum21LNBA/UQ6PXyb2ISI/AAAAAAAADPM/kJLhIyvx_2k/s512/Agra-trip%252520147.JPG" /> 
    My dearest one.. Atharv with Geetu. — at Taj Mahal</a> 
  <a class="small polaroid img3" href="#"> 
    <img alt="" src="https://lh6.googleusercontent.com/-Bz8NR-oKxGw/UQ6PguAxrsI/AAAAAAAADNY/B7i8X02vnbg/s512/Agra-trip%252520153.JPG" /> 
    Ferntastic</a> 
  <a class="medium polaroid img4" href="#"> 
    <img alt="" src="https://lh4.googleusercontent.com/-gB3RNt_3aos/UQ6Pmx5egoI/AAAAAAAADKM/lensH9ojFd0/s512/Agra-trip%252520154.JPG" /> 
    My dearest one.. Atharv with Geetu. — at Taj Mahal</a> 
  <a class="polaroid img5" href="#"> 
    <img alt="" src="https://lh5.googleusercontent.com/-YbVIBYilZ-M/UQ6P0w2PC8I/AAAAAAAADNc/kKzFy9k51D8/s512/Agra-trip%252520170.JPG" /> 
    Atharv & Geetu with Dhiraj.. Taj in background</a> 
  <a class="polaroid img6" href="#"> 
    <img alt="" src="https://lh6.googleusercontent.com/-IedPhDIDTcg/UQ6P5NG_hSI/AAAAAAAADKw/frG26WPd_OY/s512/Agra-trip%252520175.JPG" /> 
    Atharv in a cute pose.. Taj mahal in background</a> 
  <a class="polaroid img7" href="#"> 
    <img alt="" src="https://lh6.googleusercontent.com/-fhOKmDe-6S4/UQ6QBnHRDhI/AAAAAAAADPw/StGk4el6PVI/s512/Agra-trip%252520192.JPG" /> 
    Atharv with his papa Dhiraj</a> 
  <a class="small polaroid img8" href="#"> 
    <img alt="" src="https://lh4.googleusercontent.com/-lUXHF4hGxak/UQ6QF_7iZnI/AAAAAAAADOs/-agtNNnnYbU/s512/Agra-trip%252520193.JPG" /> 
    awesome</a> 
  <a class="medium polaroid img9" href="#"> 
    <img alt="" src="https://lh3.googleusercontent.com/-a-kezOzwNR8/UQ6QNJpEa4I/AAAAAAAADNk/FAN4Z3LDy2Y/s512/Agra-trip%252520206.JPG" /> 
    Geetu with Dhiraj</a> 
  <a class="polaroid img10" href="#"> 
    <img alt="" src="https://lh6.googleusercontent.com/-J3Gcspy0HKg/UQ6QXk3ZV9I/AAAAAAAADQE/0PyQD_VvC8o/s512/Agra-trip%252520221.JPG" /> 
    Nice one..</a> 
  <a class="small polaroid img11" href="#"> 
    <img alt="" src="https://lh5.googleusercontent.com/-OLpIvUAwZ6E/UQ6QY9gnPwI/AAAAAAAADNo/00eTz4E3_GI/s512/Agra-trip%252520223.JPG" /> 
    Sulphurous</a> 
  <a class="small polaroid img12" href="#"> 
    <img alt="" src="https://lh6.googleusercontent.com/-V-NJ8w3N5hs/UQ6QYqtZVOI/AAAAAAAADOw/FcjS2sgQXxA/s512/Agra-trip%252520229.JPG" /> 
    Atharv with his papa..</a> <a class="small polaroid img13" href="#"> 
    <img alt="" src="https://lh4.googleusercontent.com/-W1T4Z6_xwlQ/UQ6QAdQwuzI/AAAAAAAADNg/vSiGaoo7_TU/s512/Agra-trip%252520188.JPG" /> 
    Atharv with his papa Dhiraj</a> 
  <a class="small polaroid img14" href="#"> 
    <img alt="" src="https://lh6.googleusercontent.com/-Bz8NR-oKxGw/UQ6PguAxrsI/AAAAAAAADNY/B7i8X02vnbg/s512/Agra-trip%252520153.JPG" /> 
    Nice one..</a> 
  <a class="polaroid img15" href="#"> 
    <img alt="" src="https://lh4.googleusercontent.com/-W1T4Z6_xwlQ/UQ6QAdQwuzI/AAAAAAAADNg/vSiGaoo7_TU/s512/Agra-trip%252520188.JPG" /> 
    Atharv with his papa Dhiraj</a> 
</div>

CSS

a.polaroid {
		display: block;
		text-decoration: none;
		color: #333;
		padding: 10px 10px 20px 10px;
		width: 150px;
		border: 1px solid #d7d7d7;
		background-color: white; background:rgba(255,255,255,.9);
		z-index: 2;
		font-size: 0.7em;
		-webkit-box-shadow: 2px 2px 4px rgba(0,0, 0, 0.3),inset 0 0 0.7em rgba(0,0, 0, 0.4);;
		-moz-box-shadow: 2px 2px 4px rgba(0,0, 0, 0.3),inset 0 0 0.7em rgba(0,0, 0, 0.4);;
		box-shadow: 2px 2px 4px rgba(0,0, 0, 0.3),inset 0 0 0.7em rgba(0,0, 0, 0.4);-webkit-filter: blur(1px); border-radius:5px;
		-webkit-transition: all 0.5s ease-in; text-align:center
	}
	a.polaroid:hover, a.polaroid:focus, a.polaroid:active {
		z-index: 999;
		border-color: #999;
		-webkit-box-shadow: 15px 15px 20px rgba(0,0, 0, 0.4),inset 0 0 0.7em rgba(0,0, 0, 0.4);
		-moz-box-shadow: 15px 15px 20px rgba(0,0, 0, 0.4),inset 0 0 0.7em rgba(0,0, 0, 0.4);
		box-shadow: 15px 15px 20px rgba(0,0, 0, 0.4),inset 0 0 0.7em rgba(0,0, 0, 0.4);
		-webkit-transform: rotate(0deg) scale(1.05);
		-moz-transform: rotate(0deg) scale(1.05);
		transform: rotate(0deg) scale(1.05);-webkit-filter: blur(0px);
	}
	.polaroid img {
		margin: 0 0 15px;
		width: 150px;
		height: 120px;
	}

	a img {
		border: none;
		display: block;
	}

	.photo-album {
		position: relative; width: 80%; margin: 0 auto; max-width: 70em; height: 450px; margin-top:2.5em; min-width: 800px; max-width: 900px;
	}
	.photo-album .polaroid {
		position: absolute;
	}
	.photo-album h2 {
		position: absolute; z-index: 5; top: 150px; text-align: center; width: 100%; line-height: 2; 
	}
	.photo-album h2 span {
		background-color: white; background:rgba(255,255,255,.8);
		font-family: 'Satisfy', cursive;
		padding: 0.4em 0.8em 0.3em 0.8em;
		-webkit-box-shadow: 2px 2px 4px rgba(0,0, 0, 0.3);
		-moz-box-shadow: 2px 2px 4px rgba(0,0, 0, 0.3);
		box-shadow: 2px 2px 4px rgba(0,0, 0, 0.3);
		border-radius: 5px; border:1px solid #CCC
	}
	.photo-album .small {
		width: 75px; padding: 6px 6px 12px 6px; font-size: 0.6em;
	}
	.photo-album .small img {
		width: 75px; height: 60px;
	}
	.photo-album .medium {
		width: 200px; padding: 13px 13px 26px 13px; font-size: 0.8em;
	}
	.photo-album .medium img {
		width: 200px; height: 165px;
	}
	.photo-album .large {
		width: 300px; padding: 20px 20px 30px 20px; font-size: 1em;
	}
	.photo-album .large img {
		width: 300px; height: 250px
	}
	.photo-album .img1 {
		bottom: 10px; right: 365px; 
		-webkit-transform: rotate(10deg);
		-moz-transform: rotate(10deg);
		transform: rotate(10deg);
	}
	.photo-album .img2 {
		top: 50px; right: 20px;
		-webkit-transform: rotate(-4deg);
		-moz-transform: rotate(-4deg);
		transform: rotate(-4deg);
	}
	.photo-album .img3 {
		left: 400px; top: 0;
		-webkit-transform: rotate(-5deg);
		-moz-transform: rotate(-5deg);
		transform: rotate(-5deg);
	}
	.photo-album .img4 {
		top: 10px; left: 495px;
		-webkit-transform: rotate(-20deg);
		-moz-transform: rotate(-20deg);
		transform: rotate(-20deg);
	}
	.photo-album .img5 {
		bottom: 0; right: 0;
		-webkit-transform: rotate(1deg);
		-moz-transform: rotate(1deg);
		transform: rotate(1deg);
	}
	.photo-album .img6 {
		bottom: 10px; right: 156px;
		-webkit-transform: rotate(6deg);
		-moz-transform: rotate(6deg);
		transform: rotate(6deg);
	}
	.photo-album .img7 {
		bottom:0; left:400px;
		-webkit-transform: rotate(-10deg);
		-moz-transform: rotate(-10deg);
		transform: rotate(-10deg);
	}
	.photo-album .img8 {
		bottom: -20px; left: 700px;
		-webkit-transform: rotate(-8deg);
		-moz-transform: rotate(-8deg);
		transform: rotate(-8deg);
	}
	.photo-album .img9 {
		bottom: 0; left: 0;
		-webkit-transform: rotate(-8deg);
		-moz-transform: rotate(-8deg);
		transform: rotate(-8deg);
	}
	.photo-album .img10 {
		top: 0; left: 20px;
		-webkit-transform: rotate(8deg);
		-moz-transform: rotate(8deg);
		transform: rotate(8deg);
	}
	.photo-album .img11 {
		top: 0; right: 0;
		-webkit-transform: rotate(-8deg);
		-moz-transform: rotate(-8deg);
		transform: rotate(-8deg);
	}
	.photo-album .img12 {
		top: 0; left: 680px;
		-webkit-transform: rotate(18deg);
		-moz-transform: rotate(18deg);
		transform: rotate(18deg);
	}
	.photo-album .img13 {
		bottom: -20px; right: 630px;
		-webkit-transform: rotate(4deg);
		-moz-transform: rotate(4deg);
		transform: rotate(4deg);
	}
	.photo-album .img14 {
		top: 90px; left: 430px;
		-webkit-transform: rotate(15deg);
		-moz-transform: rotate(15deg);
		transform: rotate(15deg);
	}
	.photo-album .img15 {
		left:176px; top:20px;
		-webkit-transform: rotate(-8deg);
		-moz-transform: rotate(-8deg);
		transform: rotate(-8deg);
	}	
	a:hover, a:focus {
		z-index: 5;
	}

view demo

Your turn

I hope you enjoyed this article and the techniques I used. Please share your comments and questions below!

Posted by: Dhiraj kumar

Cool inset Text Effect with CSS3 Text-Shadow

So, I have seen a few tutorials online about using text-shadow to create a basic inset text effect, but they are all lacking the real design aspect that makes the type look like it is actually INSET. That aspect is the inner shadow.

Introduction

I played around with trying to hack box-shadow into background-image in the same way that you can add linear gradients to text, but to no avail.

Well, in any case, I finally was able to get something to work, and yes, it is pretty killer.


insetText

That’s it right there. But, let’s take a look at how and why this works.

First let’s start with defining our class and setting our font. We have styled our div and our body and now we want this text to look like it is stamped into to page.

The CSS

.insetText {
        font-family: Lucida Grande;
}

The next step we want to take is to set the background-color of the text to the color that we want the inset to be. So…

.insetText {
        font-family: Lucida Grande;
        background-color: #666666;
}

Next, we are going to use the background-clip CSS3 property to create a clipping mask using the text to mask the background. Now if you are a designer, you probably already know how a clipping mask works. The color black is transparent to the background and the color white is opaque. Thus, the image behind the mask will show through on only the black parts and the white parts will ‘clip’ it. Remember that, because it’s important.

Remember, CSS3 is not standard yet and may not be supported in older browsers. For now, it’s best to use the standard AND browser specific properties for any CSS3, so…

.insetText {
        font-family: Lucida Grande;
        background-color: #666666;
        -webkit-background-clip: text;
	-moz-background-clip: text;
	background-clip: text;
}

Now, I know. It doesn’t look like that did anything, whatsoever. We are back where we started, right? Wrong, in truth, the background color has been clipped behind the text, so it only shows through where the text is. The problem is that the browser default CSS is to make text black. So, now we simply use color to make the text transparent.

.insetText {
        font-family: Lucida Grande;
        background-color: #666666;
        -webkit-background-clip: text;
	-moz-background-clip: text;
	background-clip: text;
        color: transparent;
}

Now we’re getting somewhere. We have taken transparent text and used it to clip it’s grey background. Here is where the magic happens. We will use the text-shadow property with rgba colors. Since the text is transparent, the entire shadow, even what is normally hidden by the text in front of it, will show. If we offset the shadow vertically, it will appear as if it is on the inside of the text. And if we blur the edges, it should actually appear like an inset shadow, since the darker clipped background fading into the white shadow right? And the shadow that falls outside of the clipping mask should appear to glow slightly, since that it’s closer in color to the contrasting background! So…

.insetText {
        font-family: Lucida Grande;
        background-color: #666666;
        -webkit-background-clip: text;
	-moz-background-clip: text;
	background-clip: text;
        color: transparent;
        text-shadow: rgba(255,255,255,1.0) 0px 3px 3px;
}

Yeah, that looks pretty good, right? I just don’t like how the inside of the text in now white. It looks kind of unnatural, and it really takes away from the outer glow that gives it the inset look. So let’s revise our shadow color by dropping it’s opacity or ‘a’ value to 0.5. Like so…

.insetText {
        font-family: Lucida Grande;
        background-color: #666666;
        -webkit-background-clip: text;
	-moz-background-clip: text;
	background-clip: text;
        color: transparent;
        text-shadow: rgba(255,255,255,0.5) 0px 3px 3px;
}

Perfect! Now we have a completely CSS based inset text effect! We can now add this class to any text element on our websites, without having to open Photoshop or Illustrator, create the document, design the effect, save the image, upload the image, and then place the image in our markup where it will slow down our load time. You would add this to your markup like so…

<h1>This is inset text</h1>

This solution is great for headings. The smaller you make your text the smaller you will need to make your text-shadow.

NOTE: This method is currently only supported by Webkit browser like Google Chrome and Apple Safari.

Thanks for reading, and I hope this helped!

view demo

Posted by: Dhiraj kumar

Rotating Words With CSS Animations – CSS3 Keyframes Animation Example

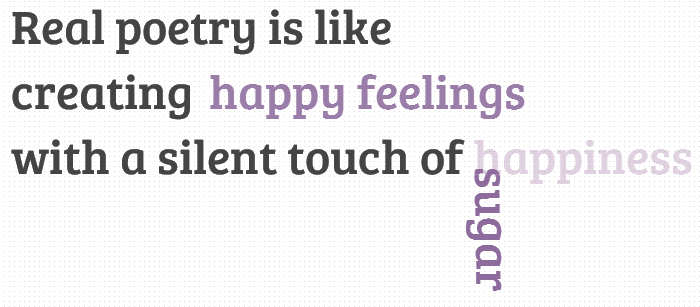
In today’s tutorial we’ll create another typography effect. The idea is to have some kind of sentence and to rotate a part of it. We’ll be “exchanging” certain words of that sentence using CSS animations.
Please note: the result of this tutorial will only work as intended in browsers that support CSS animations.
So let’s start!

In the following, we’ll be going through demo.

rotating-words-css-animations

THE HTML

We’ll have a main wrapper with a h2 heading that contains first-level spans and two divisions for the rotating words:

<section class="rw-wrapper">
	<h2 class="rw-sentence">
		<span>Real poetry is like</span>
		<br />
		<span>creating beautiful butterflies</span>
		<br />
		<span>with a silent touch of</span>
		<div class="rw-words rw-words-1">
			<span>spice</span>
			<span>colors</span>
			<span>happiness</span>
			<span>wonder</span>
			<span>sugar</span>
			<span>happiness</span>
		</div>
	</h2>
</section>

Now, ignoring the garbage placeholder text, we want each span of the rw-word to appear at a time. For that we’ll be using CSS animations. We’ll create one animation for each division and each span will run it, just with different delays.
So, let’s look at the CSS.

THE CSS3

First, we will style the main wrapper and center it on the page:

.rw-wrapper{
	width: 80%;
	position: relative;
	margin: 110px auto 0 auto;
	font-family: 'Bree Serif';
	padding: 10px;
	height: 400px;
	overflow: hidden;
}

We’ll add some text shadow to all the elements in the heading:

.rw-sentence{
	margin: 0;
	text-align: left;
	text-shadow: 1px 1px 1px rgba(255,255,255,0.8);
}

And add some specific text styling to the spans:

.rw-sentence span{
	color: #444;
	white-space: nowrap;
	font-size: 200%;
	font-weight: normal;
}

The divisions will be displayed as inline elements, that will allow us to “insert” them into the sentence without breaking the flow:

.rw-words{
	display: inline;
	text-indent: 10px;
}

Each span inside of a rw-words div will be positioned absolutely and we’ll hide any overflow:

.rw-words span{
	position: absolute;
	opacity: 0;
	overflow: hidden;
	color: #888;
	-webkit-transform-origin: 10% 75%;
	-moz-transform-origin: 10% 75%;
	-ms-transform-origin: 10% 75%;
	-o-transform-origin: 10% 75%;
	transform-origin: 10% 75%;
}

Now, we’ll run two animations. As mentioned previously, we’ll run the same animation for all the spans in one div, just with different delays:

.rw-words-1 span{
	animation: rotateWord 16s linear infinite 0s;
}
.rw-words-2 span{
    animation: rotateWordsSecond 18s linear infinite 0s;
}
.rw-words span:nth-child(2) {
	animation-delay: 3s; 
	color: #6b889d;
}
.rw-words span:nth-child(3) {
	animation-delay: 6s; 
	color: #6b739d;	
}
.rw-words span:nth-child(4) {
	animation-delay: 9s; 
	color: #7a6b9d;
}
.rw-words span:nth-child(5) {
	animation-delay: 12s; 
	color: #8d6b9d;
}
.rw-words span:nth-child(6) {
	animation-delay: 15s; 
	color: #9b6b9d;
}

Our animations will run one cycle, meaning that each span will be shown once for three seconds, hence the delay value. The whole animation will run 6 (number of images) * 3 (appearance time) = 18 seconds.
We will need to set the right percentage for the opacity value (or whatever makes the span appear). Dividing 6 by 18 gives us 0.333… which would be 33% for our keyframe step. Everything that we want to happen to the span needs to happen before that. So, after tweaking and seeing what fits best, we come up with the following animation (Fade in and “fall”) for the first words:

@keyframes rotateWord {
    0% { opacity: 0; }
    5% { opacity: 1; }
    17% { opacity: 1; transform: rotate(0deg); }
	19% { opacity: 1; transform: rotate(98deg); }
	21% { opacity: 1; transform: rotate(86deg); }
	23% { opacity: 1; transform: translateY(85px) rotate(83deg); }
	25% { opacity: 0; transform: translateY(170px) rotate(80deg); }
	80% { opacity: 0; }
    100% { opacity: 0; }
}

We’ll fade in the span and we’ll also animate its height.
The animation for the words in the second div will fade in and animate their width. We added a bit to the keyframe step percentages here, because we want these words to appear just a tiny bit later than the ones of the first word:

@keyframes rotateWordsSecond {
    0% { opacity: 1; animation-timing-function: ease-in; width: 0px; }
    10% { opacity: 0.3; width: 0px; }
    20% { opacity: 1; width: 100%; }
    27% { opacity: 0; width: 100%; }
    100% { opacity: 0; }
}

css3-animations-rotating-words

And that’s it folks! There are many possibilities for the animations, you can check out the demo and see what can be applied!
I hope you enjoyed this tutorial and find it inspiring!
view demo


Posted by: Dhiraj kumar

Creating CSS Starbursts Design with CSS3 Transform

Working with the new CSS3 rotation property I got that I could create image free starbursts. All I needed was a series of nested block-level elements each rotated by a slightly different amount. The rotation would distribute the box corners around the circumference of the star.

About these CSS3 Starbursts:

A good thing is if you create your starbursts with CSS3 you can do so much more than with images. You can experiment with different numbers of points/corners, rounded borders, resize, text-shadows and animations also.

To see the animations you will need to use latest browsers like IE 9+, Firefox 4.0+, Safari 4.1+ and Chrome 3.0+.

css-starburst-design

No CSS Hacks

There are no CSS hacks required for these CSS3 starbursts. CSS is designed to be backwards compatible so any browser that cannot understand CSS3 will simply ignore these new rules without any error.

iPhone, iPod Touch, & iPad Compatible

The Safari browser is one of the most advanced when it comes to CSS3 because it uses the powerful Webkit rendering engine. This means all these animated starbursts will work fine on the iPhone, iPod Touch and the iPad.

SEO Friendly

Because the text in each starburst is actually real text it will be crawled and indexed by Google like everything else. It also means that people who are vision impaired can more easily read and understand your web page if they are using a screen reader.

No Images Required

All of the shapes, colours and shadows in the starbursts above are created using CSS3 rules. No images are used at all.

No JavaScript Required

The animations in these demos are made possible with the CSS3 transition rules. No JavaScript is used to create any effects.

Resizable Text Compatible

All the dimensions of the starbursts are set in em measurements. This means that you can increase the text size in your browser and the starburst will grow in size along with all other text. This is great news for web accessibility.

view demo

The HTML

<div class="price-container">
  <div class="price">
    <span class="label">Buy</span>
    <span class="number">$99.95</span>
    <span class="label">Now</span>
  </div>
</div>

I have <div> that, you guessed it, contains the price starburst. I’ll use this for the background of the starburst. The <div> is the container for the text inside (the price info.) That’s it for the markup. From here, I’ll be styling pseudo classes to create the multiple points. Also, I mentioned earlier that there were a few less points in the CSS version of this starburst. This markup doesn’t really have anything unnecessary in it.

The CSS

Now on to the fun part. Let me overview what I’m going to do, then I’ll show you the styles needed to achieve it. I’m going to style .price-container.price, and the :before and:after pseudo elements for each. Essentially, I’ve got six elements to work with. I created this background image to apply to each of the elements and I will rotate 15 degrees each:

image used for starburst

The CSS is a little bit longer. I’ve used the rotation rules in the CSS, one is for Firefox (prefixed with -moz-), one is for webkit i.e. Safari and Chrome (prefixed with -webkit-), one is for Internet Explorer (prefixed with -ms-), one is for Opera (prefixed with -o-), and the other is the standard rotation rule as it will be used once this rotation property becomes standard:

.price-container,
.price-container:before,
.price-container:after,
.price-container .price,
.price-container .price:before,
.price-container .price:after {
	height: 8.5em;
	width: 8.5em;
	background: #760B1F url(price-bg.png) top left no-repeat;
	background-size: 8.5em;
}

.price-container:before,
.price-container:after,
.price-container .price:before,
.price-container .price:after {
	content: "";
	position: absolute;
}

.price-container {
	margin: 100px auto; /* Centering for demo */
	position: relative; /* Context */
	top: 2.5em;
	left: 2.5em;
	-webkit-transform: rotate(-45deg);
	  -moz-transform: rotate(-45deg);
	   -ms-transform: rotate(-45deg);
	    -o-transform: rotate(-45deg);
	       transform: rotate(-45deg);
}

.price-container:before {
	top: 0;
	left: 0;
	-webkit-transform: rotate(-30deg);
	  -moz-transform: rotate(-30deg);
	   -ms-transform: rotate(-30deg);
	    -o-transform: rotate(-30deg);
	       transform: rotate(-30deg);
}

.price-container:after {
	top: 0;
	left: 0;
	-webkit-transform: rotate(-15deg);
	  -moz-transform: rotate(-15deg);
	   -ms-transform: rotate(-15deg);
	    -o-transform: rotate(-15deg);
	       transform: rotate(-15deg);
}

.price-container .price {
	padding: .5em 0em;
	height: 7.5em; /* height minus padding */
	position: absolute;
	bottom: 0;
	right: 0;
	-webkit-transform: rotate(45deg);
	  -moz-transform: rotate(45deg);
	   -ms-transform: rotate(45deg);
	    -o-transform: rotate(45deg);
	       transform: rotate(45deg);
	z-index: 1; /* important so the text shows up */
}

.price-container .price:before {
	top: 0;
	left: 0;
	-webkit-transform: rotate(60deg);
	  -moz-transform: rotate(60deg);
	   -ms-transform: rotate(60deg);
	    -o-transform: rotate(60deg);
	       transform: rotate(60deg);
}

.price-container .price:after {
	top: 0;
	left: 0;
	-webkit-transform: rotate(75deg);
	  -moz-transform: rotate(75deg);
	   -ms-transform: rotate(75deg);
	    -o-transform: rotate(75deg);
	       transform: rotate(75deg);
}

A few things I’ll point out about the styles:

  • Notice the order of the rotation angles: This order is important because there is going to be text inside the inner-most element. Therefore, the last element (the one the text going in, in this case .price) has to be straight. Notice that .price-container is rotated -45 degrees and .price is rotated 45 degrees – back to 0.
  • The height and width: The height and width has to be set since we are dealing with background images here. I’ve set it in ems to adjust appropriately when the text size increases.
  • There’s a padding top and bottom on .price-container .price. That’s why the height is a little different than all the others.
  • Everything is positioned absolutely inside the first container. .price-container hasleft: 2.5em and top: 2.5em just to move the whole thing a little. When everything is rotated, the corners go of the page and out of the container a little.
  • z-index: There’s a z-index defined for .price-container .price. This is so the price information inside this div is visible.

Now all that’s left is styling the text.

.price-container .price span {
        position: relative;
	z-index: 100;
	display: block;
	text-align: center;
	color: #FE0;
	font: 1.8em/1.4em 'georgia',Sans-Serif;
	text-transform: uppercase;
}

.price-container .price span.number {
  font-weight: bold;
  font-size: 2.5em;
  line-height: .9em;
  color: #fff;
}

Some more CSS used in hover effect:

.price-container.one:hover {
	-webkit-transform: rotate(-20deg);
	-moz-transform: rotate(-20deg);
	-ms-transform: rotate(-20deg);
	-o-transform: rotate(-20deg);
	transform: rotate(-20deg);
}

Doing It Image-Free

Now, I have some extra stuff in here because the design called for this very subtle inner border. If you don’t like or need the inner border, just remove the bit about background image and background size and design will hold up fine.

Browser Support

This works as-is in IE 9+, Firefox 4.0+, Safari 4.1+ and Chrome 3.0+. IE 8 and below do not support background-size, and Chrome 1.0, Firefox 3.6 and Safari 3.0 will require some vendor prefixes. IE8 does support pseudo elements, however doesn’t support transform.

The fallback would be a colored square. Very likely not a huge problem.

auto-adjustable-dynamic-starburst-design-css3-html5

There You Have It

It’s a price star thing. Flexible enough to grow when you increase your font size. Made with some CSS. You can use this for highlighting prices, discounts etc.

That’s it!

I hope you enjoyed this article and if you have questions, comments, or suggestions, let me know! Thanks for reading.

Posted by: Dhiraj kumar

CSS tricks and hacks – Latest top ten useful tips

CSS can be complex, and as each new browser version is released, you may well find yourself struggling to keep up with the latest tips and hacks. But those tips and hacks will save your sanity! Here, I’ve put together the ten tips that I find most helpful, to save you the hassle of scrounging around the Web for solutions when time is tight.

1. BLOCK VS. INLINE LEVEL ELEMENTS

Nearly all HTML elements are either block or inline elements. The characteristics of block elements include:

  • Always begin on a new line
  • Height, line-height and top and bottom margins can be manipulated
  • Width defaults to 100% of their containing element, unless a width is specified

Examples of block elements include <div><p><h1><form><ul> and <li>. The characteristics of inline elements, on the other hand, are the opposite of block elements:

  • Begin on the same line
  • Height, line-height and top and bottom margins can’t be changed
  • Width is as long as the text/image and can’t be manipulated

Examples of inline elements include <span><a><label><input><img><strong> and <em>.

To change an element’s status, you can use display: inline or display: block. But what’s the point of changing an element from being block to inline, or vice-versa? Well, at first it may seem like you might hardly ever use this trick, but in actual fact, this is a very powerful technique, which you can use whenever you want to:

  • Have an inline element start on a new line
  • Have a block element start on the same line
  • Control the width of an inline element (particularly useful for navigation links)
  • Manipulate the height of an inline element
  • Set a background colour as wide as the text for block elements, without having to specify a width
2. ANOTHER BOX MODEL HACK ALTERNATIVE

The box model hack  is used to fix a rendering problem in pre-IE 6 browsers on PC, whereby the border and padding are included in, rather than added onto, the width of an element. A number of CSS-based solutions have been put forward to remedy this; here’s another one that I really like:

padding: 2em;
border: 1em solid green;
width: 20em;
width/**/:/**/ 14em;

The first width command is read by all browsers; the second by all browsers except IE5.x on PC. Because the second command comes second, it takes precedence over the first: any command that comes second will always override a preceding command. So, how does all this work?

By placing empty comment tags (/**/) before the colons, we instruct IE5.0 to ignore the command. Likewise, if we place empty comment tags after the colon, IE5.5 will ignore the command. Using these two rules in conjunction with each other, we can hide the command from all of IE5.x browsers.

3. MINIMUM WIDTH FOR A PAGE

A very handy CSS command that exists is the min-width command, whereby you can specify a minimum width for any element. This can be particularly useful for specifying a minimum width for a page.

Unfortunately, IE doesn’t understand this command, so we’ll need to come up with a new way of making this functionality work in this browser. First, we’ll insert a <div> under the <body> tag, as we can’t assign a minimum width to the <body>:

<body>
<div class="container">

Next, we create our CSS commands, to create a minimum width of 600px:

#container   {
min-width: 600px;
width:expression(document.body.clientWidth < 600? "600px": "auto" );
}

The first command is the regular minimum width command; the second is a short JavaScript command that only IE understands. Do note, though, that this command will cause your CSS document to become invalid; you may prefer to insert it into the head of each HTML document to get around this.

You might also want to combine this minimum width with a maximum width:

#container {
min-width: 600px;
max-width: 1200px;
width:expression(document.body.clientWidth < 600? "600px" : document.body.clientWidth > 1200? "1200px" : "auto");
}
4. IE AND WIDTH AND HEIGHT ISSUES

IE has a rather strange way of doing things. It doesn’t understand the min-width and min-height commands, but instead interprets width and height as min-width and min-height — go figure!

This can cause problems, because we may need boxes to be resizable should we need to fit more text into them, or should the user resize the text. If we use only the width and height commands on a box, non-IE browsers won’t allow the box to resize. If we only use the min-width and min-height commands, though, we can’t control the width or height in IE!

This can be especially problematic when using background images. If you’re using a background image that’s 80px wide and 35px high, you’ll want to make sure that the default size for a box using this image is exactly 80 x 35px. However, if users resize the text, the box size will need to expand gracefully.

To resolve this problem, you can use the following code for a box with class="box":

.box {
width: 80px;
height: 35px;
}

html>body .box {
width: auto;
height: auto;
min-width: 80px;
min-height: 35px;
}

All browsers will read through the first CSS rule, but IE will ignore the second rule because it makes use of the child selector command . Non-IE browsers will read through the second one, which will override the values from the first rule, because this CSS rule is more specific, and CSS rules that are more specific always override those that are less specific.

5. TEXT-TRANSFORM COMMAND

One of the lesser known, but really useful CSS commands is the text-transform command. Three of the more common values for this rule are:  text-transform: uppercasetext-transform: lowercase and text-transform: capitalize.  The first rule turns all characters into capital letters, the second turns them all into small letters, and the third makes the first letter of each word a capital letter.

This command is incredibly useful to help ensure consistency in style across an entire Website,  particularly if it has a number of content editors. Say for example your style guide dictates that words in headings must always begin with capital letters.  To ensure that this is always the case, use text-transform: capitalize. Even if site editors forget about the capitalisation, their mistake won’t show up on the Website.

It’s also preferable to use text-transform:  uppercase to capitalise words, as screen readers may pronounce shorter words in capital letters as acronyms. A great example of this is ‘CONTACT US’, which is pronounced as ‘contact U S’ by some screen readers.

6. DISAPPEARING TEXT OR IMAGES IN IE?

IE exhibits a very strange bug whereby text or background images sometimes disappear from sight. These items are still actually present and, if you highlight everything on screen or hit refresh, they’ll often re-appear. Kind of strange, huh?

This problem mostly occurs on background images and on text positioned next to a floated element. To remedy the problem,  simply insert position: relative into the CSS command for the disappearing element, and for some bizarre reason, that’ll usually fix the problem. If this doesn’t work (and sometimes, it doesn’t), assign a width to the offending element in the CSS — that should fix the problem.

7. INVISIBLE TEXT

Sometimes, you may actually want to make text invisible. Invisible text can be especially useful for screen reader users, perhaps to assign a label to a form item, or insert a heading ahead of a section. Don’t want to change the visual appearance by inserting these elements? Make them invisible, and no one using a visual browser will know they’re there.

You may also want to make text invisible if using a print or handheld CSS file, as some information may not need to be displayed on either of these mediums (see below for more on this).

To make text invisible, you can use display: none — easy! This works fine for hiding text from handhelds (if  CSS is supported) and printed Web pages, but isn’t so great for many screen readers.  Screen readers are now becoming too clever for their own good, and some will actually ignore any text that has the rule display: none assigned to it.

Therefore, for screen readers users, a new approach is needed: position: absolute; left: -9000px.  This basically takes the text and positions it 9000px to the left of the left edge of the screen, essentially making it invisible.

8. CSS DOCUMENT FOR HANDHELDS

A separate CSS document can be created for PDAs and mobile phones, and activated only when one of these devices is being used to access your site. More and more Websites are creating separate CSS documents for printing , so Web pages automatically become print-friendly when users choose to print them. You can do the same for handheld devices.

The following command is used to call up the CSS document for handheld:

<link type="text/css" rel="stylesheet" href="handheldstyle.css" media="handheld" />

CSS commands in the handheld CSS file override any equivalent commands in the main CSS document.  So, what commands should you place in this file?
Ideally, you want users of handheld devices to avoid having to scroll horizontally.

To test this, open up your Website in a regular browser window and resize it to 150px in width. Then, open up your main CSS file and insert some new commands at the very bottom of the document. The commands you place here should adjust the layout of the Website so that it doesn’t require horizontal scrolling at a width of 150px. Then, open up a new document, cut and paste these new commands over, and save it as handheldstyle.css (or whatever name you want to give it).

Your Websites offering to users of handheld devices should be quite different to its offering to traditional Web browsers, as the user experience is quite different on a handheld device. For further information, a book such as Handheld Usability , by S.W. Weiss, is a great read.

9. 3-D PUSH BUTTON EFFECT

Back in the early days of the Web, 3-d buttons that appeared to become pushed in when moused over were all the rage. At that time, this could only be achieved through images and JavaScript, but now, with the advent of CSS, we can go retro and re-create this 3-d effect.

The main CSS commands you’ll need are:

a {
display: block;
border: 1px solid;
border-color: #aaa #000 #000 #aaa;
width: 8em;
background: #fc0;
}

a:hover {
position: relative;
top: 1px;
left: 1px;
border-color: #000 #aaa #aaa #000;
}

Aside from these commands, you can insert other commands to achieve the desired presentation effect — the only limit is your imagination!

10. SAME NAVIGATION CODE ON EVERY PAGE

Most Websites highlight the navigation item relating to each user’s location within the Website, to help users orientate themselves. This is a fundamental requirement for basic usability, but it can be a pain: we need to tweak the HTML code behind the navigation for each and every page. Can we have the best of both worlds? Is it possible to have the navigation highlighted on every page, without having to tweak the HTML code on every page? Of course it is!

First of all, you’ll need to assign a class to each navigation item:

<ul>
<li><a href="#" class="home">Home</a></li>
<li><a href="#" class="about">About us</a></li>
<li><a href="#" class="contact">Contact us</a></li>
</ul>

You’ll then need to insert an id into the <body> tag. The id should be representative of where users are located in the site, and should change when users move to a different site section. When on the ‘Home’ page, it should read <body id="home">, in ‘About Us’, it should read <body id="about">, and in ‘Contact Us’, <body id="contact">.

Next, you create a new CSS rule:

#home .home, #about .about, #about .about, #contact .contact {
commands for highlighted navigation go here
}

This basically creates a rule that only takes effect when class="home" is contained within id="home", and when class="about" is in id="about" and class="contact" is in id="contact". These situations will only occur when the user is in the appropriate section of the site,  seamlessly creating our highlighted navigation item.

Posted by: Dhiraj kumar

Unquoted font family names in CSS

CSS

Are the quotes in font-family: 'Comic Sans MS' required, or not?

According to the the CSS validator, the quotes are supposed to be there in this case because the font family name contains spaces:

Family names containing whitespace should be quoted. If quoting is omitted, any whitespace characters before and after the name are ignored and any sequence of whitespace characters inside the name is converted to a single space.

However, this is an error in the CSS validator. The warning message suggests that all font family names containing whitespace should be quoted, which is simply not true. font-family: Comic Sans MS (without quotes) is perfectly valid CSS that works the way you’d expect it to.

In reality, it’s a bit more complex. To grok the rules on font family names, we need to understand the difference between CSS strings and identifiers first.

Strings and identifiers

The spec says the following about strings:

Strings can either be written with double quotes or with single quotes.

Identifiers are defined as follows:

In CSS, identifiers (including element names, classes, and IDs in selectors) can contain only the characters[a-zA-Z0-9] and ISO 10646 characters U+00A0 and higher, plus the hyphen (-) and the underscore (_).

ISO 10646 defines the Universal Character Set, which correlates to the Unicode standard. Note that they’re actually talking about the hyphen-minus character — not the hyphen character, which is U+2010. The code point for hyphen-minus is U+002D, and for underscore (low line) it’s U+005F. The highest code point currently allowed by Unicode is U+10FFFF. So, any character matching the regular expression [-_\u00A0-\u10FFFF] is allowed in an identifier.

The spec continues:

[Identifiers] cannot start with a digit, two hyphens, or a hyphen followed by a digit. Identifiers can also contain escaped characters and any ISO 10646 character as a numeric code […]. For instance, the identifier B&W? may be written as B\&W\? or B\26 W\3F .

Translated into regex: any string that matches ^(-?\d|--) is not a valid CSS identifier.

Whitespace

Both the CSS 2.1 and CSS3 Fonts Module Level 3 specs say:

Font family names must either be given quoted as strings, or unquoted as a sequence of one or more identifiers. This means most punctuation characters and digits at the start of each token must be escaped in unquoted font family names.

Note: “a sequence of one or more identifiers” implies that multiple space-separated identifiers will form a single font family name. Therefore, font-family: Comic Sans MS is valid, and equivalent to font-family: 'Comic Sans MS'. The former consists of three space-separated identifiers, the latter is simply a string.

This is clarified a few paragraphs down in the spec:

If a sequence of identifiers is given as a font family name, the computed value is the name converted to a string by joining all the identifiers in the sequence by single spaces.

The aforementioned CSS validator warning describes what happens if leading or trailing whitespace is used around identifier sequences:

[A]ny whitespace characters before and after the name are ignored, and any sequence of whitespace characters inside the name is converted to a single space.

This is implied by the spec text, too: an unescaped whitespace character can never be part of an identifier, so it can never start a “sequence of identifiers”.

Generic family keywords

The spec defines the following generic family keywords: serifsans-serifcursivefantasy, andmonospace. These keywords can be used as a general fallback mechanism, in case the desired font choices are not available. Authors are encouraged to append a generic font family as a last alternative for improved robustness. As keywords, they must not be quoted.

In other words, font-family: sans-serif means that a generic sans-serif font family will be used, whilefont-family: 'sans-serif' (with quotes) refers to an actual font that goes by the name of sans-serif. A very important difference!

Other keyword values

The same behavior applies to a few other keywords, too:

Font family names that happen to be the same as a keyword value (inheritserifsans-serifmonospace,fantasy, and cursive) must be quoted to prevent confusion with the keywords with the same names. The keywords initial and default are reserved for future use and must also be quoted when used as font names. User agents must not consider these keywords as matching the <family-name> type.

Note that all keywords are case-insensitive. For example, Monospacemonospace, and mOnOsPaCe all refer to the same keyword, and if you want to use a font with that exact family name rather than the default keyword value, you’ll need to quote it.

Summary

As long as the only disallowed characters in an otherwise valid identifier are single U+0020 space characters, and all space-separated parts are valid identifiers too, the identifier sequence can be used as an unquoted font family name (unless it’s a keyword, but there are no keywords with spaces in them).

If a font family name matches a keyword, it must be quoted to form a string.

If you want to use an invalid CSS identifier as (part of) a font family name, you’ll need to quote it to form a string instead; or you could just escape any special characters so it can remain an unquoted identifier.

Here are some example font-family declarations:

/* Invalid because `/` is not allowed in an identifier: */ font-family: Red/Black;
 /* Valid — an escaped `/` symbol is allowed in an identifier: */ font-family: Red\/Black;
 /* Invalid because a string cannot be combined with an identifier: */ font-family: 'Lucida' Grande;
 /* Valid — it’s a single string: */ font-family: 'Lucida Grande';
 /* Valid — it’s a space-separated sequence of two identifiers: */ font-family: Lucida Grande;
 /* Valid — it’s still a space-separated sequence of two identifiers: */ font-family: Lucida     Grande;
 /* Invalid because `!` is not allowed in an identifier: */ font-family: Ahem!;
 /* Valid — it’s a string: */ font-family: 'Ahem!';
 /* Valid — an escaped `!` is allowed in an identifier: */ font-family: Ahem\!;
 /* Invalid because an identifier cannot start with a digit: */ font-family: Hawaii 5-0;
 /* Valid — it’s a string: */ font-family: 'Hawaii 5-0';
 /* Valid — `\35 ` (including the space) is an escape sequence for `5`: */ font-family: Hawaii \35 -0;
 /* Valid — `\ ` (including the space) is an escape sequence for ` `: */ font-family: Hawaii\ 5-0;
 /* Invalid — `$` is not allowed in an identifier: */ font-family: $42;
 /* Valid — an escaped `$` symbol is allowed in an identifier: */ font-family: \$42;
 /* Valid — `€` is allowed in an identifier: */ font-family: €42;

Bonus puzzle: Other than keywords, I can only think of one font family name that can’t be used without quotes — there is no way to escape it in an identifier. Do you know which one?

Posted by: Dhiraj kumar

Clearing floats methods nowadays

At my beginnings as a web designer using Div tags, when I first discovered clear floats I was so happy and it was for sure an “a-ha” moment. Since then, so many things have changed and new clearing methods have appeared. One thing remained the same: the need to clear floats.

In this article, we’ll see some effective solutions for clearing floated elements.

clearing-floats

But first, what is float?

Arranging website page elements was always a struggle for you as a web designer. To achieve your desired website layout, a lot of calculation of box dimensions are needed, and various implementation decisions must be taken as well.

At the beginning, perhaps you used table elements to structure your layout, and even if tables are very intuitive, the table purpose is to list tabular data. You also tried the CSS display values like: tabletable-cell or table-row to build structures, but shortly you gave up as there wasn’t enough support for that.

In the end, you got rid of table markup and skipped to div floats.

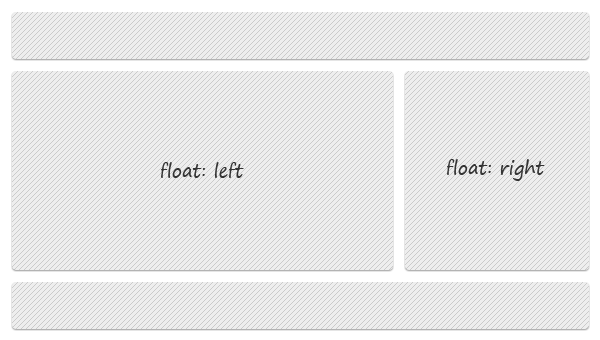
So, float is a CSS property which help you aligning and positioning your web page elements.

clearing-floats-simple-example
Simple floats example

Clearing floats

Elements placed after a floated element will wrap around the floated element. To avoid this behavior, you must clear floats. To do that, generally you use the clear property which has four values: leftrightboth and none.

<div style="float:left"></div>
<div style="float:right"></div>
<div style="clear:both"></div>

The above is a common example.

Beside the above example that requires extra HTML markup, below is a list with some clearing methods that I found very useful (and they do not require extra markup):

Clearfix reloaded by Thierry Koblentz

clearfix-reloaded

.clearfix:before,
.clearfix:after{
  content: ".";
  display: block;
  height: 0;
  overflow: hidden;
}
.clearfix:after {clear: both;}
.clearfix {zoom: 1;} /* IE < 8 */

New clearfix hack by Jeff Starr

new-clearfix-hack

.clearfix:after{
  visibility: hidden;
  display: block;
  font-size: 0;
  content: " ";
  clear: both;
  height: 0;
}

* html .clearfix             { zoom: 1; } /* IE6 */
*:first-child+html .clearfix { zoom: 1; } /* IE7 */

Micro clearfix hack by Nicolas Gallagher

micro-clearfix

.cf:before,
.cf:after{
  content:"";
  display:table;
}

.cf:after{
  clear:both;
}

/* For IE 6/7 (trigger hasLayout) */
.cf{
  zoom:1;
}

CSS clearing floats with overflow by Nick La

clear-overflow

That’s it!

You may already know the above techniques and my questions is:  Which one do you use most? Share your opinion with us!

Posted by: Dhiraj kumar

jQuery Plugin for Cartoon-like Background Image Sprite Animation – AniDG – (alernative to animated Gif)

What is AniDg?

AniDg is a simple plugin for jQuery which allows you animate background images. The plugin is basically an alternative to the animated GIF but with several benefits. At first, it’s always better to use an animated GIF as this format is supported by all browsers without any JavaScript code or additional markup, but the “dark side” of it is that an animated GIF allows only 256 colors and you cannot control animation in any way. The AniDg loads a long vertical image and changes its background position with the speed you setup, giving you more control of the animation. For Better quality you can call PNG, JPG, GIF images in background image sprite as per your requirements.

Demo

jQuery Plugin AniDG Background image animation

Features

  1. Light-weight script (Only 1Kb :))
  2. Easy to integrate
  3. Fully customizable via CSS
  4. Works with all modern browsers 🙂

How to Use

METHOD #1: EASY

Simply place the following code anywhere inside thetag of your webpage:

<script type="text/javascript" src="http://code.jquery.com/jquery-latest.js"></script>
<script type="text/javascript" src="http://demo.web3designs.com/jquery-ani.dg.min.js"></script>

METHOD #2: ADVANCED

STEP ONE: Download AniDg.zip or http://demo.web3designs.com/AniDg.zip. The package already contains all files used in this demo.

STEP TWO: Unzip and place the file jquery-ani.dg.min.js in the same location as the webpage that is displaying the animation. (Make sure paths to files are correct.)

STEP THREE: include the following code in the <head>…</head> section of your webpage:

<script type="text/javascript" src="http://code.jquery.com/jquery-latest.js"></script>
<script type="text/javascript" src="jquery-ani.dg.min.js"></script>

3.) Add a style containing the url to your background with animation (this may be added to a separate CSS document or inside the <head>…</head> tag):

<style type="text/css">
#animation-1 {
background: url(images/sample-animation.gif) no-repeat left top;
}
</style>

4.) Add an empty DIV which will display animation in your document:

<div id="animation-1"></div>

5.) Add the following code to your <head>…</head> tag to initialize AniDg and start the animation.

<script type="text/javascript">
$(document).ready(function(){
$('#animation-1').anidg({ frameWidth: 100, frameHeight: 100, speed: 100, totalFrames: 19 });
$('#animation-1').anidg.play();
});
</script>

That’s it 😉 Click the Demo button to see it in action.

Public Functions

anidg.play()
Start playing animation.

anidg.pause()
Pause animation.

anidg.stop()
Stop animation.

Parameters

The table below contains a list of parameters accepted by the .anidg() function.

Parameters Description
frameWidth Width of a single frame.
frameHeight Height of a single frame.
speed Animation speed.
totalFrames Total frames in the animation.
loop Loop an animation or not. By default, value is true.

Posted by: Dhiraj kumar