CSS Vendor Prefixes or CSS3 browser prefixes

CSS vendor prefixes or CSS browser prefixes are a way for browser makers to add support for new CSS features in a sort of testing and experimentation period. Browser prefixes are used to add new features that may not be part of a formal specification and to implement features in a specification that hasn’t been finalized. read more @ http://www.css-jquery-design.com/…

CSS-Vendor-Prefixes-or-CSS3-browser-prefixes

The CSS browser prefixes are:

  • Android: -webkit-
  • Chrome: -webkit-
  • Firefox: -moz-
  • Internet Explorer: -ms-
  • iOS: -webkit-
  • Opera: -o-
  • Safari: -webkit-

In most cases, to use a more advanced CSS style property, you take the standard CSS property and add the prefix above for each browser. read more @ http://www.css-jquery-design.com/…
read-more-button

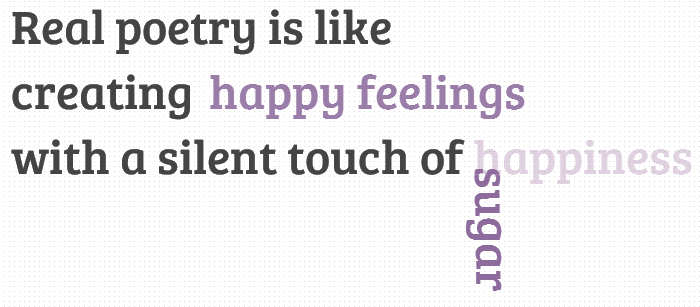
Rotating Words With CSS Animations – CSS3 Keyframes Animation Example

In today’s tutorial we’ll create another typography effect. The idea is to have some kind of sentence and to rotate a part of it. We’ll be “exchanging” certain words of that sentence using CSS animations.
Please note: the result of this tutorial will only work as intended in browsers that support CSS animations.
So let’s start!

In the following, we’ll be going through demo.

rotating-words-css-animations

THE HTML

We’ll have a main wrapper with a h2 heading that contains first-level spans and two divisions for the rotating words:

<section class="rw-wrapper">
	<h2 class="rw-sentence">
		<span>Real poetry is like</span>
		<br />
		<span>creating beautiful butterflies</span>
		<br />
		<span>with a silent touch of</span>
		<div class="rw-words rw-words-1">
			<span>spice</span>
			<span>colors</span>
			<span>happiness</span>
			<span>wonder</span>
			<span>sugar</span>
			<span>happiness</span>
		</div>
	</h2>
</section>

Now, ignoring the garbage placeholder text, we want each span of the rw-word to appear at a time. For that we’ll be using CSS animations. We’ll create one animation for each division and each span will run it, just with different delays.
So, let’s look at the CSS.

THE CSS3

First, we will style the main wrapper and center it on the page:

.rw-wrapper{
	width: 80%;
	position: relative;
	margin: 110px auto 0 auto;
	font-family: 'Bree Serif';
	padding: 10px;
	height: 400px;
	overflow: hidden;
}

We’ll add some text shadow to all the elements in the heading:

.rw-sentence{
	margin: 0;
	text-align: left;
	text-shadow: 1px 1px 1px rgba(255,255,255,0.8);
}

And add some specific text styling to the spans:

.rw-sentence span{
	color: #444;
	white-space: nowrap;
	font-size: 200%;
	font-weight: normal;
}

The divisions will be displayed as inline elements, that will allow us to “insert” them into the sentence without breaking the flow:

.rw-words{
	display: inline;
	text-indent: 10px;
}

Each span inside of a rw-words div will be positioned absolutely and we’ll hide any overflow:

.rw-words span{
	position: absolute;
	opacity: 0;
	overflow: hidden;
	color: #888;
	-webkit-transform-origin: 10% 75%;
	-moz-transform-origin: 10% 75%;
	-ms-transform-origin: 10% 75%;
	-o-transform-origin: 10% 75%;
	transform-origin: 10% 75%;
}

Now, we’ll run two animations. As mentioned previously, we’ll run the same animation for all the spans in one div, just with different delays:

.rw-words-1 span{
	animation: rotateWord 16s linear infinite 0s;
}
.rw-words-2 span{
    animation: rotateWordsSecond 18s linear infinite 0s;
}
.rw-words span:nth-child(2) {
	animation-delay: 3s; 
	color: #6b889d;
}
.rw-words span:nth-child(3) {
	animation-delay: 6s; 
	color: #6b739d;	
}
.rw-words span:nth-child(4) {
	animation-delay: 9s; 
	color: #7a6b9d;
}
.rw-words span:nth-child(5) {
	animation-delay: 12s; 
	color: #8d6b9d;
}
.rw-words span:nth-child(6) {
	animation-delay: 15s; 
	color: #9b6b9d;
}

Our animations will run one cycle, meaning that each span will be shown once for three seconds, hence the delay value. The whole animation will run 6 (number of images) * 3 (appearance time) = 18 seconds.
We will need to set the right percentage for the opacity value (or whatever makes the span appear). Dividing 6 by 18 gives us 0.333… which would be 33% for our keyframe step. Everything that we want to happen to the span needs to happen before that. So, after tweaking and seeing what fits best, we come up with the following animation (Fade in and “fall”) for the first words:

@keyframes rotateWord {
    0% { opacity: 0; }
    5% { opacity: 1; }
    17% { opacity: 1; transform: rotate(0deg); }
	19% { opacity: 1; transform: rotate(98deg); }
	21% { opacity: 1; transform: rotate(86deg); }
	23% { opacity: 1; transform: translateY(85px) rotate(83deg); }
	25% { opacity: 0; transform: translateY(170px) rotate(80deg); }
	80% { opacity: 0; }
    100% { opacity: 0; }
}

We’ll fade in the span and we’ll also animate its height.
The animation for the words in the second div will fade in and animate their width. We added a bit to the keyframe step percentages here, because we want these words to appear just a tiny bit later than the ones of the first word:

@keyframes rotateWordsSecond {
    0% { opacity: 1; animation-timing-function: ease-in; width: 0px; }
    10% { opacity: 0.3; width: 0px; }
    20% { opacity: 1; width: 100%; }
    27% { opacity: 0; width: 100%; }
    100% { opacity: 0; }
}

css3-animations-rotating-words

And that’s it folks! There are many possibilities for the animations, you can check out the demo and see what can be applied!
I hope you enjoyed this tutorial and find it inspiring!
view demo


Posted by: Dhiraj kumar

Top 10 Reasons to Start Using HTML5 Right Now…

So you’re still not using HTML5, huh? I guess you probably have your reasons; it’s not fully adopted yet, it doesn’t work in IE, you don’t like users, you’re out of touch or you are just passionately in love with writing strict XHTML code. HTML5 is the revolution that the web needed and the fact is, it is the future whether you like it or not — suck it up and deal. HTML5 isn’t hard to use or understand and even though it’s not fully adopted yet, there are still plenty of reasons to start using it right now — like right after you get done reading this article.

html5-reasons

There are lots of articles touting the use of HTML5 and praising the benefits of it, yes this is another one of those. With all these articles, with Apple pushing it, with Adobe building new dev products around it, and with so many web sites devoted to it, I still talk to fellow designers and developers who haven’t or won’t adopt it for a variety of reasons. I think the main problem is, it still seems like a mysterious creature to many. To many it feels more like the jet pack or the flying car — an awesome idea that is fun to think about but still not practical in its use. Wrong, the reality is that it is extremely practical right now! It’s not the latest Mercedes concept car being towed around form car show to car show, it’s a reality and it’s not going anywhere.

In order to further demystify HTML5 and help these knuckle dragging designers and developers to jump on the bandwagon I’ve put together a top ten list of reasons why we should all be using HTML5 right now. For those that currently use HTML5 this list may not be anything new or ground breaking, but hopefully it will inspire you to share the benefits of HTML5 with others in the community. We’ll do this Letterman countdown style (minus the celebrity presenter) and start with number ten – accessibility.

10 – ACCESSIBILITY

HTML5 makes creating accessible sites easier for two main reasons: semantics and ARIA. The new (some currently available) HTML headings like <header>, <footer>, <nav>, <section>, <aside>, etc. allow screen readers to easily access content. Before, your screen readers had no way to determine what a given <div> was even if you assigned it an ID or Class. With new semantic tags screen readers can better examine the HTML document and create a better experience for those who use them.

ARIA is a W3C spec that is mainly used to assign specific “roles” to elements in an HTML document – essentially creating important landmarks on the page: header, footer, navigation or article, via role attributes. This has been well overlooked and widely under-used mostly due to the fact that it wasn’t valid, however, HTML5 will validate these attributes. Also, HTML5 will have built in roles that can’t be over-ridden making assigning roles a no brainer. For a more in depth discussion on HTML5 and ARIA please visit the WAI.

9 – VIDEO AND AUDIO SUPPORT

Forget about Flash Player and other third party media players, make your videos and audio truly accessible with the new HTML5 <video> and <audio> tags. Getting your media to play correctly has always been pretty much a nightmare, you had to use the and <object> tags and assign a huge list of parameters just to get the thing visible and working correctly. Your media tags just become these nasty, huge chunks of confusing code segments. HTML5′s video and audio tags basically treat them as images; <video src=”url”/>. But what about all those parameters like height, width and autoplay? No worries my good man, just define those attributes in the tag just like any other HTML element: <video src=”url” width=”640px” height=”380px” autoplay/>.

It’s actually that dead simple, however because old evil browsers out there don’t like our HTML5 friend, you’ll need to add a little bit more code to get them working correctly… but this code isn’t nearly as gnarly and messy as the <object> and tags:

<video poster="myvideo.jpg" controls>
 <source src="myvideo.m4v" type="video/mp4" />
 <source src="myvideo.ogg" type="video/ogg" />
</video>

Some resources worth checking out:

8 – DOCTYPE

doctype html

<!DOCTYPE html>

Yup that’s it, that is the doctype, nothing more, nothing less. Pretty simple right? No more cutting and pasting some long unreadable line of code and no more dirty head tags filled with doctype attributes. You can simply and easily type it out and be happy. The really great thing about it though, beyond the simplicity, is that it works in every browser clear back to the dreaded IE6.

7 – CLEANER CODE

If you are passionate about simple, elegant, easy to read code then HTML5 is the beast for you. HTML5 allows you to write clear and descriptive code, semantic code that allows you to easily separate meaning from style and content. Consider this typical and simple header code with navigation:

<div id="header">
<h1>Header Text</h1>
<div id="nav">
<ul>
<li><a href="#">Link</a></li>
</ul>
</div>
</div>

So this code is pretty clean and simple? But with HTML5 you can clean this up even more and at the same time give your markup more meaning:

<header>
 <h1>Header Text</h1>
 <nav>
  <ul>
   <li><a href="#">Link</a></li>
   <li><a href="#">Link</a></li>
   <li><a href="#">Link</a></li>
  </ul>
 </nav>
</header>

With HTML5 you can finally cure your “divitis” and “classitis” by using semantic and HTML headers to describe your content. Previously you would generally just use div’s for every block of content than drop an id or class on it to describe its content but with the new <section>, <article>, <header>, <footer>, <aside> and <nav> tags, HTML5 allows you to code your markup cleaner as well as keep your CSS better organized and happier.

Some resources worth checking out:

6 – SMARTER STORAGE

One of the coolest things about HTML5 is the new local storage feature. It’s a little bit of a cross between regular old cookies and a client-side database. It’s better than cookies because it allows for storage across multiple windows, it has better security and performance and data will persist even after the browser is closed. Because it’s essentially a client side data base you don’t have to worry about the user deleting cookies and it is been adopted by all the popular browsers.

Local storage is great for many things, but it’s one of HTML5 tools that are making web apps possible without third party plugins. Being able to store data in the user’s browser allows you to easily create those app features like: storing user information, the ability to cache data, and the ability to load the user’s previous application state. If you are interested in getting started with local storage, check out Christian Heilmann’s great 24 Ways article from last year —Wrapping Things Nicely with HTML5 Local Storage.

Some more resources worth checking out:

5 – BETTER INTERACTIONS

Awe, we all want better interactions, we all want a more dynamic website that responds to the user and allows the user to enjoy/interact your content instead of just look at it. Enter <canvas>, the drawing HTML5 tag that allows you to do most (if not more) interactive and animated possibilities than the previous rich internet application platforms like Flash.

Beyond <canvas>, HTML5 also comes with a slew of great APIs that allow you to build a better user experience and a beefier, more dynamic web application — here’s a quick list of native APIs:

  • Drag and Drop (DnD)
  • Offline storage database
  • Browser history management
  • document editing
  • Timed media playback

For way more info on these APIs and more native interactive features of HTML5 visit HTML5Doctor.

Some resources worth checking out:

4 – GAME DEVELOPMENT

Yup, that is correct, you can develop games using HTML5′s <canvas> tag. HTML5 provides a great, mobile friendly way to develop fun, interactive games. If you’ve built Flash games before, you’ll love building HTML5 games.

Script-Tutorials has recently offered a four part series of lessons focused on HTML5 game development, head on over and check out some of the sick stuff they have created:

Some more resources worth checking out:

3 – LEGACY/CROSS BROWSER SUPPORT

modern browsers support

Your modern, popular browsers all support HTML5 (Chrome, Firefox, Safari IE9 and Opera) and the HTML5 doctype was created so that all browsers, even the really old and annoying ones, er, IE6 can use it. But just because old browsers recognize the doctype that doesn’t mean they can use all the new HTML5 tags and goodies. Fortunately, HTML5 is being built to make things easier and more cross browser friendly so in those older IE browsers that don’t like the new tags we can just simply add a Javascript shiv that will allow them to use the new elements:

<!--[if lt IE 9]>
<script src="http://html5shiv.googlecode.com/svn/trunk/html5.js"></script>
<![endif]-->

Some resources worth checking out:

2 – MOBILE, MOBILE, MOBILE

Call it a hunch, but I think mobile technology is becoming more popular these days. I know, that is a pretty crazy assumption and some of your are probably thinking — mobile is just a fad… right. Mobile devices are taking over the world. The adoption of mobile devices continues to grow very rapidly and this means that more and more users will be using their mobile browsers to view your web site or application. HTML5 is the most mobile ready tool for developing mobile sites and apps. With Adobe announcing the death of mobile Flash, you will now count on HTML5 to do your mobile web application development.

Mobile browsers have fully adopted HTML5 so creating mobile ready projects is as easy as designing and constructing for their smaller touch screen displays — hence the popularity of Responsive Design. There are some great meta tags that also allow you to optimize for mobile:

  • Viewport: allows you to define viewport widths and zoom settings
  • Full screen browsing: IOS specific values that allow Apple devices to display in full screen mode
  • Home Screen Icons: like favicons on desktop, these icons are used to add favorites to the home screen of an IOS and Android mobile device

For more info on how to mobilize your site via HTML5, check out “Mobifying” Your HTML5 Site.

Some resources worth checking out:

1 – IT’S THE FUTURE, GET WITH IT!

The number one reason why you should start using HTML5 today is this: it’s the future, start using it now so you don’t get left behind. HTML5 is not going anywhere and as more and more elements get adopted more and more companies will start to develop in HTML5. HTML5 is essentially just HTML, it’s not scary, it’s not anything you really need to figure out or relearn — if you’re developing XHTML strict right now you are already developing in HTML5 so why not take full advantage of it’s current capability?

You really don’t have any excuses not to adopt HTML5 and begin your new love affair with it. Truly, the only real reason I prefer to use HTML5 is just to write cleaner code, all the other benefits and fun features I haven’t even really jumped into yet, but that is the great thing about it, you can just start using it right now and not even change the way you design. So, start using it right now, whether you are just simplifying and making your markup more semantic OR you are gonna build some sick new mobile game that will take over the world — who knows, maybe you can start selling stuffed animal versions of your gaming characters too.

GREAT HTML5 RESOURCES

http://html5doctor.com
http://html5rocks.com
http://html5weekly.com
http://www.remysharp.com
http://www.script-tutorials.com

Posted by: Dhiraj kumar

Creating CSS Starbursts Design with CSS3 Transform

Working with the new CSS3 rotation property I got that I could create image free starbursts. All I needed was a series of nested block-level elements each rotated by a slightly different amount. The rotation would distribute the box corners around the circumference of the star.

About these CSS3 Starbursts:

A good thing is if you create your starbursts with CSS3 you can do so much more than with images. You can experiment with different numbers of points/corners, rounded borders, resize, text-shadows and animations also.

To see the animations you will need to use latest browsers like IE 9+, Firefox 4.0+, Safari 4.1+ and Chrome 3.0+.

css-starburst-design

No CSS Hacks

There are no CSS hacks required for these CSS3 starbursts. CSS is designed to be backwards compatible so any browser that cannot understand CSS3 will simply ignore these new rules without any error.

iPhone, iPod Touch, & iPad Compatible

The Safari browser is one of the most advanced when it comes to CSS3 because it uses the powerful Webkit rendering engine. This means all these animated starbursts will work fine on the iPhone, iPod Touch and the iPad.

SEO Friendly

Because the text in each starburst is actually real text it will be crawled and indexed by Google like everything else. It also means that people who are vision impaired can more easily read and understand your web page if they are using a screen reader.

No Images Required

All of the shapes, colours and shadows in the starbursts above are created using CSS3 rules. No images are used at all.

No JavaScript Required

The animations in these demos are made possible with the CSS3 transition rules. No JavaScript is used to create any effects.

Resizable Text Compatible

All the dimensions of the starbursts are set in em measurements. This means that you can increase the text size in your browser and the starburst will grow in size along with all other text. This is great news for web accessibility.

view demo

The HTML

<div class="price-container">
  <div class="price">
    <span class="label">Buy</span>
    <span class="number">$99.95</span>
    <span class="label">Now</span>
  </div>
</div>

I have <div> that, you guessed it, contains the price starburst. I’ll use this for the background of the starburst. The <div> is the container for the text inside (the price info.) That’s it for the markup. From here, I’ll be styling pseudo classes to create the multiple points. Also, I mentioned earlier that there were a few less points in the CSS version of this starburst. This markup doesn’t really have anything unnecessary in it.

The CSS

Now on to the fun part. Let me overview what I’m going to do, then I’ll show you the styles needed to achieve it. I’m going to style .price-container.price, and the :before and:after pseudo elements for each. Essentially, I’ve got six elements to work with. I created this background image to apply to each of the elements and I will rotate 15 degrees each:

image used for starburst

The CSS is a little bit longer. I’ve used the rotation rules in the CSS, one is for Firefox (prefixed with -moz-), one is for webkit i.e. Safari and Chrome (prefixed with -webkit-), one is for Internet Explorer (prefixed with -ms-), one is for Opera (prefixed with -o-), and the other is the standard rotation rule as it will be used once this rotation property becomes standard:

.price-container,
.price-container:before,
.price-container:after,
.price-container .price,
.price-container .price:before,
.price-container .price:after {
	height: 8.5em;
	width: 8.5em;
	background: #760B1F url(price-bg.png) top left no-repeat;
	background-size: 8.5em;
}

.price-container:before,
.price-container:after,
.price-container .price:before,
.price-container .price:after {
	content: "";
	position: absolute;
}

.price-container {
	margin: 100px auto; /* Centering for demo */
	position: relative; /* Context */
	top: 2.5em;
	left: 2.5em;
	-webkit-transform: rotate(-45deg);
	  -moz-transform: rotate(-45deg);
	   -ms-transform: rotate(-45deg);
	    -o-transform: rotate(-45deg);
	       transform: rotate(-45deg);
}

.price-container:before {
	top: 0;
	left: 0;
	-webkit-transform: rotate(-30deg);
	  -moz-transform: rotate(-30deg);
	   -ms-transform: rotate(-30deg);
	    -o-transform: rotate(-30deg);
	       transform: rotate(-30deg);
}

.price-container:after {
	top: 0;
	left: 0;
	-webkit-transform: rotate(-15deg);
	  -moz-transform: rotate(-15deg);
	   -ms-transform: rotate(-15deg);
	    -o-transform: rotate(-15deg);
	       transform: rotate(-15deg);
}

.price-container .price {
	padding: .5em 0em;
	height: 7.5em; /* height minus padding */
	position: absolute;
	bottom: 0;
	right: 0;
	-webkit-transform: rotate(45deg);
	  -moz-transform: rotate(45deg);
	   -ms-transform: rotate(45deg);
	    -o-transform: rotate(45deg);
	       transform: rotate(45deg);
	z-index: 1; /* important so the text shows up */
}

.price-container .price:before {
	top: 0;
	left: 0;
	-webkit-transform: rotate(60deg);
	  -moz-transform: rotate(60deg);
	   -ms-transform: rotate(60deg);
	    -o-transform: rotate(60deg);
	       transform: rotate(60deg);
}

.price-container .price:after {
	top: 0;
	left: 0;
	-webkit-transform: rotate(75deg);
	  -moz-transform: rotate(75deg);
	   -ms-transform: rotate(75deg);
	    -o-transform: rotate(75deg);
	       transform: rotate(75deg);
}

A few things I’ll point out about the styles:

  • Notice the order of the rotation angles: This order is important because there is going to be text inside the inner-most element. Therefore, the last element (the one the text going in, in this case .price) has to be straight. Notice that .price-container is rotated -45 degrees and .price is rotated 45 degrees – back to 0.
  • The height and width: The height and width has to be set since we are dealing with background images here. I’ve set it in ems to adjust appropriately when the text size increases.
  • There’s a padding top and bottom on .price-container .price. That’s why the height is a little different than all the others.
  • Everything is positioned absolutely inside the first container. .price-container hasleft: 2.5em and top: 2.5em just to move the whole thing a little. When everything is rotated, the corners go of the page and out of the container a little.
  • z-index: There’s a z-index defined for .price-container .price. This is so the price information inside this div is visible.

Now all that’s left is styling the text.

.price-container .price span {
        position: relative;
	z-index: 100;
	display: block;
	text-align: center;
	color: #FE0;
	font: 1.8em/1.4em 'georgia',Sans-Serif;
	text-transform: uppercase;
}

.price-container .price span.number {
  font-weight: bold;
  font-size: 2.5em;
  line-height: .9em;
  color: #fff;
}

Some more CSS used in hover effect:

.price-container.one:hover {
	-webkit-transform: rotate(-20deg);
	-moz-transform: rotate(-20deg);
	-ms-transform: rotate(-20deg);
	-o-transform: rotate(-20deg);
	transform: rotate(-20deg);
}

Doing It Image-Free

Now, I have some extra stuff in here because the design called for this very subtle inner border. If you don’t like or need the inner border, just remove the bit about background image and background size and design will hold up fine.

Browser Support

This works as-is in IE 9+, Firefox 4.0+, Safari 4.1+ and Chrome 3.0+. IE 8 and below do not support background-size, and Chrome 1.0, Firefox 3.6 and Safari 3.0 will require some vendor prefixes. IE8 does support pseudo elements, however doesn’t support transform.

The fallback would be a colored square. Very likely not a huge problem.

auto-adjustable-dynamic-starburst-design-css3-html5

There You Have It

It’s a price star thing. Flexible enough to grow when you increase your font size. Made with some CSS. You can use this for highlighting prices, discounts etc.

That’s it!

I hope you enjoyed this article and if you have questions, comments, or suggestions, let me know! Thanks for reading.

Posted by: Dhiraj kumar

CSS tricks and hacks – Latest top ten useful tips

CSS can be complex, and as each new browser version is released, you may well find yourself struggling to keep up with the latest tips and hacks. But those tips and hacks will save your sanity! Here, I’ve put together the ten tips that I find most helpful, to save you the hassle of scrounging around the Web for solutions when time is tight.

1. BLOCK VS. INLINE LEVEL ELEMENTS

Nearly all HTML elements are either block or inline elements. The characteristics of block elements include:

  • Always begin on a new line
  • Height, line-height and top and bottom margins can be manipulated
  • Width defaults to 100% of their containing element, unless a width is specified

Examples of block elements include <div><p><h1><form><ul> and <li>. The characteristics of inline elements, on the other hand, are the opposite of block elements:

  • Begin on the same line
  • Height, line-height and top and bottom margins can’t be changed
  • Width is as long as the text/image and can’t be manipulated

Examples of inline elements include <span><a><label><input><img><strong> and <em>.

To change an element’s status, you can use display: inline or display: block. But what’s the point of changing an element from being block to inline, or vice-versa? Well, at first it may seem like you might hardly ever use this trick, but in actual fact, this is a very powerful technique, which you can use whenever you want to:

  • Have an inline element start on a new line
  • Have a block element start on the same line
  • Control the width of an inline element (particularly useful for navigation links)
  • Manipulate the height of an inline element
  • Set a background colour as wide as the text for block elements, without having to specify a width
2. ANOTHER BOX MODEL HACK ALTERNATIVE

The box model hack  is used to fix a rendering problem in pre-IE 6 browsers on PC, whereby the border and padding are included in, rather than added onto, the width of an element. A number of CSS-based solutions have been put forward to remedy this; here’s another one that I really like:

padding: 2em;
border: 1em solid green;
width: 20em;
width/**/:/**/ 14em;

The first width command is read by all browsers; the second by all browsers except IE5.x on PC. Because the second command comes second, it takes precedence over the first: any command that comes second will always override a preceding command. So, how does all this work?

By placing empty comment tags (/**/) before the colons, we instruct IE5.0 to ignore the command. Likewise, if we place empty comment tags after the colon, IE5.5 will ignore the command. Using these two rules in conjunction with each other, we can hide the command from all of IE5.x browsers.

3. MINIMUM WIDTH FOR A PAGE

A very handy CSS command that exists is the min-width command, whereby you can specify a minimum width for any element. This can be particularly useful for specifying a minimum width for a page.

Unfortunately, IE doesn’t understand this command, so we’ll need to come up with a new way of making this functionality work in this browser. First, we’ll insert a <div> under the <body> tag, as we can’t assign a minimum width to the <body>:

<body>
<div class="container">

Next, we create our CSS commands, to create a minimum width of 600px:

#container   {
min-width: 600px;
width:expression(document.body.clientWidth < 600? "600px": "auto" );
}

The first command is the regular minimum width command; the second is a short JavaScript command that only IE understands. Do note, though, that this command will cause your CSS document to become invalid; you may prefer to insert it into the head of each HTML document to get around this.

You might also want to combine this minimum width with a maximum width:

#container {
min-width: 600px;
max-width: 1200px;
width:expression(document.body.clientWidth < 600? "600px" : document.body.clientWidth > 1200? "1200px" : "auto");
}
4. IE AND WIDTH AND HEIGHT ISSUES

IE has a rather strange way of doing things. It doesn’t understand the min-width and min-height commands, but instead interprets width and height as min-width and min-height — go figure!

This can cause problems, because we may need boxes to be resizable should we need to fit more text into them, or should the user resize the text. If we use only the width and height commands on a box, non-IE browsers won’t allow the box to resize. If we only use the min-width and min-height commands, though, we can’t control the width or height in IE!

This can be especially problematic when using background images. If you’re using a background image that’s 80px wide and 35px high, you’ll want to make sure that the default size for a box using this image is exactly 80 x 35px. However, if users resize the text, the box size will need to expand gracefully.

To resolve this problem, you can use the following code for a box with class="box":

.box {
width: 80px;
height: 35px;
}

html>body .box {
width: auto;
height: auto;
min-width: 80px;
min-height: 35px;
}

All browsers will read through the first CSS rule, but IE will ignore the second rule because it makes use of the child selector command . Non-IE browsers will read through the second one, which will override the values from the first rule, because this CSS rule is more specific, and CSS rules that are more specific always override those that are less specific.

5. TEXT-TRANSFORM COMMAND

One of the lesser known, but really useful CSS commands is the text-transform command. Three of the more common values for this rule are:  text-transform: uppercasetext-transform: lowercase and text-transform: capitalize.  The first rule turns all characters into capital letters, the second turns them all into small letters, and the third makes the first letter of each word a capital letter.

This command is incredibly useful to help ensure consistency in style across an entire Website,  particularly if it has a number of content editors. Say for example your style guide dictates that words in headings must always begin with capital letters.  To ensure that this is always the case, use text-transform: capitalize. Even if site editors forget about the capitalisation, their mistake won’t show up on the Website.

It’s also preferable to use text-transform:  uppercase to capitalise words, as screen readers may pronounce shorter words in capital letters as acronyms. A great example of this is ‘CONTACT US’, which is pronounced as ‘contact U S’ by some screen readers.

6. DISAPPEARING TEXT OR IMAGES IN IE?

IE exhibits a very strange bug whereby text or background images sometimes disappear from sight. These items are still actually present and, if you highlight everything on screen or hit refresh, they’ll often re-appear. Kind of strange, huh?

This problem mostly occurs on background images and on text positioned next to a floated element. To remedy the problem,  simply insert position: relative into the CSS command for the disappearing element, and for some bizarre reason, that’ll usually fix the problem. If this doesn’t work (and sometimes, it doesn’t), assign a width to the offending element in the CSS — that should fix the problem.

7. INVISIBLE TEXT

Sometimes, you may actually want to make text invisible. Invisible text can be especially useful for screen reader users, perhaps to assign a label to a form item, or insert a heading ahead of a section. Don’t want to change the visual appearance by inserting these elements? Make them invisible, and no one using a visual browser will know they’re there.

You may also want to make text invisible if using a print or handheld CSS file, as some information may not need to be displayed on either of these mediums (see below for more on this).

To make text invisible, you can use display: none — easy! This works fine for hiding text from handhelds (if  CSS is supported) and printed Web pages, but isn’t so great for many screen readers.  Screen readers are now becoming too clever for their own good, and some will actually ignore any text that has the rule display: none assigned to it.

Therefore, for screen readers users, a new approach is needed: position: absolute; left: -9000px.  This basically takes the text and positions it 9000px to the left of the left edge of the screen, essentially making it invisible.

8. CSS DOCUMENT FOR HANDHELDS

A separate CSS document can be created for PDAs and mobile phones, and activated only when one of these devices is being used to access your site. More and more Websites are creating separate CSS documents for printing , so Web pages automatically become print-friendly when users choose to print them. You can do the same for handheld devices.

The following command is used to call up the CSS document for handheld:

<link type="text/css" rel="stylesheet" href="handheldstyle.css" media="handheld" />

CSS commands in the handheld CSS file override any equivalent commands in the main CSS document.  So, what commands should you place in this file?
Ideally, you want users of handheld devices to avoid having to scroll horizontally.

To test this, open up your Website in a regular browser window and resize it to 150px in width. Then, open up your main CSS file and insert some new commands at the very bottom of the document. The commands you place here should adjust the layout of the Website so that it doesn’t require horizontal scrolling at a width of 150px. Then, open up a new document, cut and paste these new commands over, and save it as handheldstyle.css (or whatever name you want to give it).

Your Websites offering to users of handheld devices should be quite different to its offering to traditional Web browsers, as the user experience is quite different on a handheld device. For further information, a book such as Handheld Usability , by S.W. Weiss, is a great read.

9. 3-D PUSH BUTTON EFFECT

Back in the early days of the Web, 3-d buttons that appeared to become pushed in when moused over were all the rage. At that time, this could only be achieved through images and JavaScript, but now, with the advent of CSS, we can go retro and re-create this 3-d effect.

The main CSS commands you’ll need are:

a {
display: block;
border: 1px solid;
border-color: #aaa #000 #000 #aaa;
width: 8em;
background: #fc0;
}

a:hover {
position: relative;
top: 1px;
left: 1px;
border-color: #000 #aaa #aaa #000;
}

Aside from these commands, you can insert other commands to achieve the desired presentation effect — the only limit is your imagination!

10. SAME NAVIGATION CODE ON EVERY PAGE

Most Websites highlight the navigation item relating to each user’s location within the Website, to help users orientate themselves. This is a fundamental requirement for basic usability, but it can be a pain: we need to tweak the HTML code behind the navigation for each and every page. Can we have the best of both worlds? Is it possible to have the navigation highlighted on every page, without having to tweak the HTML code on every page? Of course it is!

First of all, you’ll need to assign a class to each navigation item:

<ul>
<li><a href="#" class="home">Home</a></li>
<li><a href="#" class="about">About us</a></li>
<li><a href="#" class="contact">Contact us</a></li>
</ul>

You’ll then need to insert an id into the <body> tag. The id should be representative of where users are located in the site, and should change when users move to a different site section. When on the ‘Home’ page, it should read <body id="home">, in ‘About Us’, it should read <body id="about">, and in ‘Contact Us’, <body id="contact">.

Next, you create a new CSS rule:

#home .home, #about .about, #about .about, #contact .contact {
commands for highlighted navigation go here
}

This basically creates a rule that only takes effect when class="home" is contained within id="home", and when class="about" is in id="about" and class="contact" is in id="contact". These situations will only occur when the user is in the appropriate section of the site,  seamlessly creating our highlighted navigation item.

Posted by: Dhiraj kumar

Google Font API and Typekit solutions VS CCS3 @font-face

A quick tutorial here about setting up your website with custom fonts using @font-face.  I am also sharing these alternative solutions, pros and cons.

The aim of this post is to briefly round up your options when using custom fonts in web design.

google-and-typekit-versus-font-face

CSS3 @font-face

The @font-face was first proposed for CSS2 and has been implemented in Internet Explorer since version 5.  However, their implementation relied on the proprietary Embedded Open Type (.eot) format, and no other browsers decided to use this format until Safari 3.1 was released.

Since then, web designers began to use .ttf or .otf fonts for their websites and now this CSS property is well-known.

css3-font-face

CSS

@font-face {
        font-family: '3DumbRegular';
        src: url('3Dumb-webfont.eot');
        src: local('?'), url('3Dumb-webfont.woff') format('woff'), url('3Dumb-webfont.ttf') format('truetype'), url('3Dumb-webfont.svg#webfont57ztNrX6') format('svg');
}

h1 {
  font-family: '3DumbRegular', Arial, sans-serif
}

Pros

  • A lot of available fonts you can choose from. Check this detailed list.
  • It works for all browsers.
  • It has no JavaScript dependency.

Cons

  • It takes slightly longer to implement than Google Font API (more code).
  • Quality of font rendering may differ browser to browser.
  • Your CSS may not be validated, depending on your DOCTYPE.

Google Font API

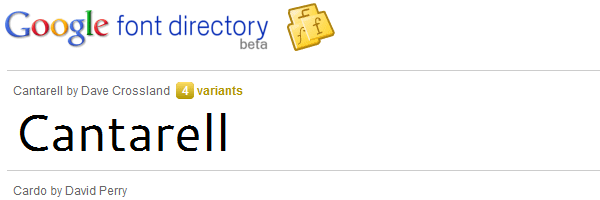
To use the fonts of Google’s font library, just go to http://code.google.com/webfonts and select a font. If you choose “Cantarell” font for example, include the following code into your files.

google-font-api

HTML

<link href="http://fonts.googleapis.com/css?family=Cantarell&subset=latin" rel="stylesheet" type="text/css">

CSS

h1 {
  font-family: 'Cantarell', arial, serif; /*Add also some font replacements, just in case...*/
}

Pros

  • Free solution from Google.
  • Quick set up.
  • No JavaScript dependency.
  • No need to think about font licensing.

Cons

  • Small number of fonts to choose from. (just for now, I hope)
  • Quality of font rendering may differ browser to browser.
  • No support for iPhone or iPad. Support added from iOS 4.2+ (iPhone, iPad, iPod).

Typekit

Typekit is a service launched by Small Batch, Inc. which, via JavaScript and a subscription service, allows webmasters and designers to embed non-standard, non-system-specific fonts into online documents. It uses the @font-face CSS property and is available to the public as a paid service.

typekit

HTML

<head>
        <script type="text/javascript" src="http://use.typekit.com/typekitid.js"></script>
        <script type="text/javascript">try{Typekit.load();}catch(e){}</script>
</head>

CSS

h1 {
        font-family: "museo-sans-1", "museo-sans-2", sans-serif;
}

Pros

  • Huge fonts library.
  • Good support articles and help section.
  • iPad, iPhone/iPod Touch support (experimental)
  • Control the behavior of your page as web fonts load (thanks @smcbride)

Cons

  • Typekit is a paid service but it also has a free version.
  • JavaScript dependency, and one extra HTTP request for you.

Other web fonts solutions

Conclusion(s)

Now that you found out all the pros and cons, it’s up to you to choose the method that best suits your needs.

Let me know in the comments the solution you like most!

Posted by: Dhiraj kumar

7 tips to organize your CSS

Working often with CSS for my own website or for my job makes me trying always to be organized and that made me thinking about a thing. What is the best way to organize my CSS file(s)? With this article I will try to present you a short guide about CSS organizing.

tips-to-organize-your-css

1. Group your CSS files into a folder

Beside your main CSS file you may want to use also a print CSS file or why not a CSS file for the IE6/7 browser. Placing them together in a folder named css for example will help you improve your website back-end structure.

group-css-files

2. Use efficient selectors

A very important thing for you to know is how browsers understand and read your CSS selectors? The answer is that they read them from right to left. That means that for the selector ul li a span the first thing thing interpreted is span.

efficient-selectors

The id is the selector with the greater specificity so always, instead div#header you should use just #header. This way your file will be less redundant and smaller. Also note that the use of efficient CSS selectors is a nowadays requirement.

3. Comment and separate your CSS rules

Generally, a CSS file contains reset styles, header, content and footer styles and in order to easier browse your CSS rules you should choose a way to separate them.

comment-css

You can choose an simple and easy to notice separator as in the following example:

  /* Header styles */
  /* ---------------------------------- */
  /* Content styles */
  /* ---------------------------------- */
  /* Footer styles */

4. Create a simple color scheme to use for your styles

When you are dealing for example with a CSS file for an web application you will use a lot common styles and colors.  So placing something as following inside a CSS comment could be very helpful for you:

  /* Colors: Light Gray #eaeaea, Dark Gray #828282, Red #c60000 */

5. Use a meaning naming convention for your selectors.

Let’s suppose you need to name your logo, menu and a tagline that are placed inside a header id wrapper. A good approach in this way would be to use namings as:

  • header-logo or h-logo
  • header-menu or h-menu
  • header-tag or h-tag

css-naming-convention

6. Create your own small CSS framework

By doing that you will be able to use these common CSS classes at any time for any elements from your markup.

.full-width{
  width: 100% !important;
}

.min-width{
  width: 1% !important;
  white-space: nowrap !important;
}

.centered-inline{
  text-align: center !important;
}

.centered-block{
  margin-left: auto !important;
  margin-right: auto !important;
}

7. Simple is better

Don’t try to complicate things because simplicity will save you time, effort and why not your remaining hair 🙂

Posted by: Dhiraj kumar

CSS3 gradients – quick tutorial

CSS3 gradients aren’t something new, but because of cross browser incompatibility, they weren’t used that much until now.

However, you should know that they are available to use in Safari, Chrome (Webkit) and Mozilla Firefox (from 4+) browsers.

With this post I will show you how to use CSS gradients for some major browsers: Firefox, Safari, Chrome and IE (surprise!).

css-gradients

But first… why use CSS3 gradients?

If CSS can help you to get rid of extra images, then you should consider this as a good solution for your design, because:

  • You will get fewer HTTP requests
  • CSS gradients are scalable, meaning less headaches for you
  • CSS3 it’s so cool 🙂

Firefox syntax

-moz-linear-gradient( [<point> || <angle>,]? <stop>, <stop> [, <stop>]* )
-moz-radial-gradient( [<position> || <angle>,]? [<shape> || <size>,]? <stop>, <stop>[, <stop>]* )

Webkit syntax

-webkit-gradient(<type>, <point> [, <radius>]?, <point> [, <radius>]? [, <stop>]*)

IE trident gradient example

I would suggest you to use these filters only in conditional CSS files, otherwise these filters will affect your files performance.

filter: progid:DXImageTransform.Microsoft.gradient(GradientType=0, startColorstr=#6191bf, endColorstr=#cde6f9); /* IE6 & IE7 */
-ms-filter: "progid:DXImageTransform.Microsoft.gradient (GradientType=0, startColorstr=#6191bf, endColorstr=#cde6f9)"; /* IE8 */

Cross-browser CSS linear gradient

But, lets see how it works. Use the following lines of code from above together and you will get a cross-browser gradient box.

css-linear-gradient

background: #6191bf; /* Fallback background color for non supported browsers */         

background-image: -moz-linear-gradient(top, #81a8cb, #cde6f9); /* Firefox 3.6 */
background-image: -webkit-gradient(linear,left bottom,left top,color-stop(0, #cde6f9),color-stop(1, #81a8cb)); /* Safari & Chrome */
filter: progid:DXImageTransform.Microsoft.gradient(GradientType=0,startColorstr='#81a8cb', endColorstr='#cde6f9'); /* IE6 & IE7 */
-ms-filter: "progid:DXImageTransform.Microsoft.gradient(GradientType=0,startColorstr='#81a8cb', endColorstr='#cde6f9')"; /* IE8 */

CSS3 radial gradient

IE gradient filters doesn’t support color-stop, gradient angle, and radial gradient. This means you can only specify just horizontal and vertical linear gradients (as above) with two colors, one for start and one for end.

But lets see how you can define a CSS3 radial gradient for Firefox, Safari and Chrome.

css-radial-gradient

background: #6191bf; /* Fallback background color for non supported browsers */          

background-image: -moz-radial-gradient(center 45deg,circle cover, #cde6f9, #6191bf);
background-image: -webkit-gradient(radial, 50% 50%, 0, 50% 50%,800, from(#cde6f9), to(#6191bf));

Conclusion

Although CSS gradients are great, not all browsers support it (yet). So, you shouldn’t totally rely on CSS gradient when coding your web design and you should always use a fallback for it.

If you have anything to add, feel free to do it in the comments below. Let me know your opinion.

Further reading

Update

Since I wrote this article, Webkit gradient syntax was updatedInternet Explorer 10 Test Drive was launched (glad to see CSS3 gradients are supported) and Opera 11 also added CSS3 gradients to its features.

So here is the latest CSS3 gradients syntax:

  background-color: #6191bf; /* Fallback background color for non supported browsers */
  background-image: -webkit-gradient(linear, left top, left bottom, from(#81a8cb), to(#cde6f9));
  background-image: -webkit-linear-gradient(top, #81a8cb, #cde6f9);
  background-image: -moz-linear-gradient(top, #81a8cb, #cde6f9);
  background-image: -ms-linear-gradient(top, #81a8cb, #cde6f9);
  background-image: -o-linear-gradient(top, #81a8cb, #cde6f9);
  background-image: linear-gradient(top, #81a8cb, #cde6f9);
  filter: progid:DXImageTransform.Microsoft.gradient(startColorStr='#81a8cb', EndColorStr='#cde6f9'); /* IE6–IE9 */

Quick tip for you

To stay updated with latest CSS3 gradients syntax, check this wonderful CSS3 resource.

Posted by: Dhiraj kumar